Showing posts with label bags. Show all posts

Monday, October 11, 2021

Love, Santa Tag Kit & Treat Bags


Hello Hivers, 

Santa’s back in a fun and easy tag kit to spruce up your Christmas gifting! The Love, Santa Tag Kit has everything you need to create 12 whimsically designed tags. 
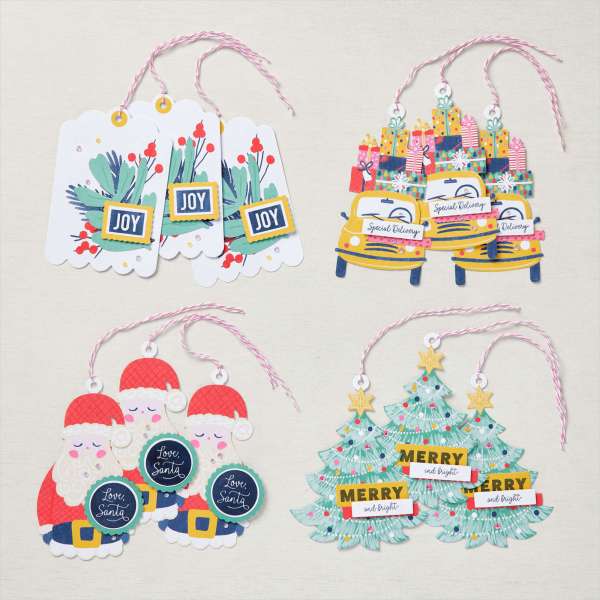

Here's everything that comes in the kit:

You just need to add scissors

Love, Santa Tag Kit      #158375      $19.00


Take a closer look at the included stamp set:

ADD SOME BAGS TO YOUR TAGS!

And to make Christmas gifting even easier, the Love, Santa Treat Bags (available for purchase separately or in a collection) are food-safe cellophane bags that coordinate with the Love, Santa tags! The treat bags come in a pack of 12—3 each of 4 festive designs (4" x 9.5"). 

Love, Santa Treat Bags      #158381     $7.00


Here they are paired with the tags:

Love, Santa Project Collection   #159362      $26.00 

Collection Includes: Tag Kit and Treat Bags

I'm sure that your neighbors, teachers, or coworkers would love to receive one of these cute bags as a gift. 

Here's an unboxing video from Sara Douglass:


As always, I want to thank you for Buzzzing by the Hive today. 
Until next time....Buzzz you later. 

                                                                  Honeybee
What if being creative was your job?
Oh, wait!  It can be!
I would love to have you join my team.
You can Join as a Hobbyist, for the Discount, or to start a Business and earn extra income!!  

Click HERE to get started.
$99 for $125 worth of products Plus Free shipping (& much more).


Join in on the Paper Pumpkin fun. Subscribe HERE.


Shop 24/7 in my Online store.  Click HERE to place your order.

Wednesday, July 22, 2020

July 2020 Paper Pumpkin Reveal Video: Summer Nights


Hello Hivers, 

Here is a look at the July 2020 Paper Pumpkin by Stampin' Up!.  It is called Summer Nights.  Here is a picture of the kit contents.  


Join me as we work our way through the reveal of this kit. I will show you step by step how I put the projects together.

Take a look at my Reveal video.


Coordinating Colors:  Blackberry Bliss, Calypso Coral, Coastal Cabana,  Night of Navy, and White


Summer Nights Add-On: #154973 $10.00 USD
Includes: 24 traditional card bases and envelopes
*Available while supplies last.


Here is the link to the Stampin' Up! Paper Pumpkin video:  https://youtu.be/vl6ua-4ofnE   They show a much simpler way to make the projects. LoL


As always, I want to thank you for Buzzzing by the Hive today. 
Until next time....Buzzz you later. 

                                                                  Honeybee


What if being creative was your job?
Oh, wait!  It can be!
I would love to have you join my team.
You can Join as a Hobbyist, for the discount, or for a Business, to earn extra income!! 

Click HERE to get started.
$99 for $125 worth of products Plus Free shipping (& much more).


Join in on the Paper Pumpkin fun. Subscribe HERE.


Shop 24/7 in my Online store.  Click HERE to place your order.

Friday, November 23, 2018

Swaps - OnStage 2018 Orlando: Part 3 of 3


Hello Hivers, 

As promised, you will find the 3rd and final video of the rest of my swaps at the bottom of this post.  They are all 3D items.  Here are some photos of the two 3D swaps that I made for OnStage.  

I used the Leaf  and Darling Label Punch to create the cute pouches below.  The sentiment is from the Treat Time stamp set.  I also used the Basic Brads for a closure.  The DSP is called Tranquil Textures.  The pouch holds 3 Hershey's Miniature candy bars.


The project below used items from the Tropical Escape Suite.  I used the DSP, stamp set, and thinlits.  I added the Pretty Label Punch and Envelope Punch Board.  I also used the Metallic Ribbon Combo Pack and the 1/8" Old Olive Sheer Ribbon.  I found the tutorial for this project here.  


Enjoy the Video


One last swap.  This project was made by Marcia Faulhaber.  It is a 3D Air Balloon.  I had it on my other desk to keep it safe and I forgot to include it in the video. I am showing photos of the front and back.  It is super cute, right?!


Oh, before I go...Here is a picture of me with my new best friend, Dawn Griffith.  


As always, thanks for Buzzzing by the Hive today. 
Until next time....Buzzz you later. 

                                                                  Honeybee


I would love to have you join my team.

Click HERE to get started.


Join in on the Paper Pumpkin fun. Subscribe HERE.


Friday, June 29, 2018

Paper Pumpkin June 2018 - Bags Alternate #7


Hello Hivers,

You all know how I love making 3D projects.  I just had to make another one using this kit.  When I seen Connie's "Tiffany & Co." bag, I just had to CASE it.  After making the Lemon Lime Twist bag using Connie's directions, I made another one that did not require me to cut the card base down. I also didn't score the sides of the bag.   

Black Bag Measurements:  (click link above for full instructions)
8.5" x 5.5"
Score Long side at:  1", 4", 5", 8"
Score Short side at: 1" on each side (one side for taller bag)


As always, thanks for Buzzzing by the Hive today. 
Until next time....Buzzz you later. 

                                                              Honeybee


Monday, October 30, 2017

Spooky Night Popcorn Treat Bag


Hello Hivers, 

Here's a great spooky treat bag.  I found the instructions on Pinterest and now and I can't find them to share.  I used the Spooky Night DSP along with the Spooky Cat stamp set.  I punched out an window with the Starburst Punch and put a Window Sheet in the opening.  I filled the bag with Caramel Apple Popcorn.   I finished decorating with a banner and some Black Shimmer Ribbon.


As always, thanks for Buzzzing by the Hive today. 
Until next time....Buzzz you later.

                                                            Honeybee


Wednesday, April 26, 2017

Punch Board Purse


Hello Hivers,

I can't believe that it is almost time for this Annual and Occasions catalog to be over.  I will miss some of the retiring products.  The Falling in Love DSP, Botanical Builder framelits, and the Botanical Blooms stamp set will all be retiring.  I found the tutorial for this purse on Pinterest or Youtube...I can't remember.  I can't seem to find it.  I really like the design...no 12" x 12" card sock needed.  I will have to search harder for this tutorial because I know I would like to make more.

Don't forget to stop by the newly updated Clearance Rack for some great deals...and check on the Retirement List, as well.  All items are while supplies last.

Update:  Found the tutorial HERE.


As always, thanks for Buzzzing by the Hive today.
Until next time....Buzzz you later.

Friday, April 21, 2017

Gift Bag Backpack


Hello Hivers,

Today's project is another that I found on Youtube.  I used the Falling in Love Designer Series Paper on this bag.  I just love this DSP.  It makes for beautiful projects.  I opted to add a flap for closure to my bag and at the last moment, I thought it would make a cute backpack...so I added the straps on the back.  I also didn't have any Early Espresso 12" x 12" card stock to create the bag, so I had to figure out the measurements using 8.5" x 11" card stock.  I think I did a great job.

Measurements

Bag
8.5" x 11"
Score on the short side at 1.75"
Score on the long side at 3.5", 5.25", 8.75", and 10.5"

Flap
3.5" x 2.75" Score at 1" on the short side.  (add inside on back panel)

Follow Ann's instructions in the video on how to put it all together.


As always, thanks for Buzzzing by the Hive today.
Until next time....Buzzz you later.

Monday, April 17, 2017

Detailed Floral Purse


Hello Hivers,

Here is a beautiful purse that I made using the Awesome tutorial by Bibi Cameron.  I love how this purse turned out.  I am thinking of using it for Mother's Day...maybe to gift an array of gift cards or Lottery scratch offs.

As always, thanks for Buzzzing by the Hive today.
Until next time....Buzzz you later.

Tuesday, November 29, 2016

One Sheet Purse


Hello Hivers,

I've been on Pinterest again.  I found a video tutorial for making this cute purse.  It uses an entire 12 x 12 sheet of the Presents & Pinecones DSP.  I made a banner using the Triple Banner punch and Jar of Cheer stamp set to decorate the purse.  I added the bows using the Everyday Jar framelits.  I cut them out then stamped.  Sometimes I find that is easier with the small images.  Which way do you prefer to do things?


Until next time....Buzzz you later.

Friday, February 26, 2016

Mini Bag-A-Lopes

Hello Hivers,

Here is the last of the Bag-A-Lopes I made using the October 2015 Paper Pumpkin Kit.  These were made using the 3x3 envelopes.  I got the idea from a fellow stamper over on Pinterest.  These bags are just so tiny and cute.  Just the right size to hold a wedding favor.  

Sometime next week I will share all the cards I made using this kit.  I have to warn you...They Are Gorgeous. 

Until next time....Buzzz you later,
Honeybee

Wednesday, February 24, 2016

Flowering Bag-A-Lope


Hello Hivers,

As promised, here is another alternate project made using the Oct. 2015 Paper Pumpkin Kit.  This is another of the envelopes that I made into a bag.  I stamped the flower image on Whisper White card stock and water-colored the images before cutting them out.  I added a Rhinestone Basic Jewels to each flower just to add some bling.  

Until next time....Buzzz you later,
Honeybee

Monday, February 22, 2016

Friendly Heart Bag-A-Lope

Hello Hivers,

I am so behind on my stamping.  I just recently got around to playing with my October 2015 Paper Pumpkin Kit.  I searched Pinterest and found some wonderful alternate ideas for using the kit.  One of the ideas was using the envelopes for making bags or boxes.  I love the way this one turned out.  I will be sharing more of the kit projects later this week. 

Supplies:
October 2015 Paper Pumpkin Kit
Bloomin' Love stamp set
Mini Treat Bag Thinlits
Rhinestone Basic Jewels
Whisper White Cardstock
Calypso Coral Classic Ink


Until next time....Buzzz you later,
Honeybee

Thursday, November 19, 2015

My Paper Pumpkin September 2015

Hello Hivers,

So, as I stated previously, I didn't order the September 2015 Paper Pumpkin.  However, I did order 4 of the Refill Kits to make up some more of these cute bags to be used at Thanksgiving.  I must say I noticed some very big differences with the bags I used from the corner store and Stampin' Up! bags.
The SU! bags are smaller, but they are so much thicker, thereby, sturdier.  Having everything already cut and ready to go made this project super easy and quick to put together.
Because I only purchased the refill kit, I wasn't able to get the stamp set or ink spot.  So, on my tags I used the Trust God stamp set with Tangerine Tango classic ink.

Until next time....Buzzz you later,
Honeybee

Saturday, October 24, 2015

Baby Shower Thank You

Hello Hivers,

I didn't get to order the September Paper Pumpkin.  But I loved the idea so much that I had to CASE it.  I made these adorable thank you bags for my niece's baby shower.  They were a huge hit with all of her guests.


What's inside the bag? ==>>


Until next time....Buzzz you later,
Honeybee

Monday, August 17, 2015

Box in a Bohemian Bag


Hello Hivers,

I created this cute box in a bag to hold Bath & Body Works shower gel.  This would make a great gift presentation for any occasion.  I love the rich colors in the Bohemian Designer Series Paper.  I added a little border at the bottom of the bag using the Bohemian Borders stamp set.  The main image can be found in the Feel Goods stamp set.  The Decorative Label punch was just what I needed to add some stability for the closure of this bag.

To make the box I started with a 3.5" x 4.75" piece of card stock and scored all four sides at .75".
The DSP was cut at 12" x 7.25" and the top and bottom solid card stock was cut at 11" x .75".


Until next time....Buzzz you later,
 Honeybee

Important Buzzziness

Copyright © Stampin' Up! ®
**All photographs, designs, artwork and text copyright © Stampin' Up! ® and/or Tashana Lundy . The content is shared for inspirational and personal use only. You may not submit any of my artwork or 3-D items for publication through Stampin' Up! , for contest, or any other forms of media. I am an Independent Stampin' Up! Demonstrator and My blog, services, and classes are
not endorsed by/affiliated with Stampin' Up!.
Thanks a bunch.**